

How To Control Fan Speed Laptop Windows 10
Typically, CPU fan noises are heard when you lot reboot your PC (the whirring sound you lot may have heard upon startup) and it goes on to decline as the startup procedure completes. The purpose of fans on your CPU is to blow off the heat that your processor may generate when a process is going through. You may have felt your PC getting hot when information technology's riddled with many windows and applications and information technology after cooling down in a while; it's the fans at play. In this article, we will be discussing how you can command the speed of your CPU fans on Windows.

Why is information technology important to monitor CPU Fan Speed in Windows?
The machinery of CPU fans is pretty straightforward. They keep a periodic cheque on your PC's temperature and go turned on and off accordingly. Every PC has air vents to allow the heat to escape. If you lot find your CPU fans to be running constantly, information technology'due south a sign that your system is overloading and that may cause issues with your ability adapter too. Thus, it can exist very important to maintain a residue with the CPU fan speed while as well keeping your PC's temperature in check.
How to command Fan Speed on Windows 11/10
You tin can check, control, increase, monitor or modify the CPU Fan Speed safely in Windows xi/10 by post-obit these steps. Hither, we volition be primarily discussing how you can continue your CPU fan speed in cheque using the Command Panel, your PC's BIOS command, or a tertiary-political party fan controller SpeedFan.
- Control CPU fan speed via the Control Panel
- Use BIOS/UEFI to control the CPU fan speed
- Control CPU Fan speed using SpeedFan.
i] Control CPU fan speed via the Control Panel
Here's how you can admission fan control settings in your Control Console:
- Open the Control Panel and click on Hardware and Audio
- Hither, click on Power Options and further select Choose when to turn off the display
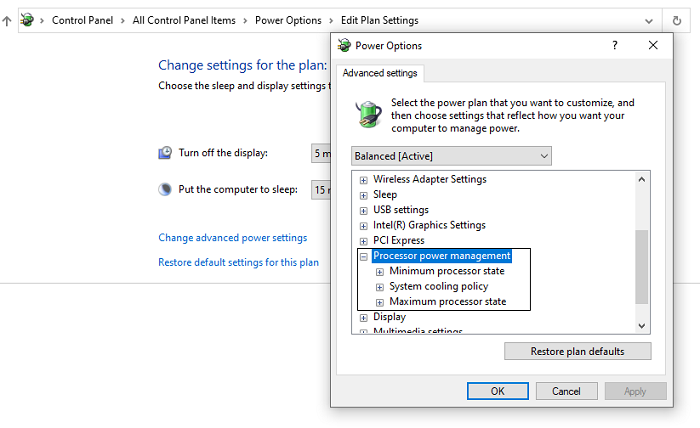
- Open the Avant-garde power settings page
- From this subsequent dialog box, locate Procedure power direction
- Here, select Organisation Cooling Policy and toggle the setting to 'Active'
Save these changes by clicking on Apply and you tin then exit the window. The System Cooling option is absent in Windows xi computers, so if you're using that version of the Windows OS then you should go for the 2d and tertiary ways.
Read: Best Laptop cooling software.
2] Apply BIOS/UEFI to control the CPU fan speed
The Advanced Startup option BIOS has fan controlling settings in it which may differ based on your computer. Hither's how you tin can admission and modify those settings:
How to open BIOS settings
- You can either, restart your PC and when information technology boots back up, press the 'Delete' and 'F12' keys together
- Alternatively, you tin can follow this trajectory: Settings > Update & security > Recovery > Avant-garde Startup > Restart Now > Troubleshoot > Avant-garde options > UEFI Firmware settings > Click Restart
How to use BIOS
- On the BIOS front folio, locate Fan Command Settings
- Become to Monitor > Status > Fan speed control
- Here, look for RPM settings. Once found, select the CPU fan to increase or subtract its speed with RPM as a unit
- Save these changes and press Esc till y'all reach the menu choice.
Read: All-time practices to keep your figurer absurd.
iii] Control CPU Fan speed using SpeedFan

The complimentary app SpeedFan can help you lot find the cause behind a heightened CPU fan speed with ease. Information technology searches your estimator for informative chips and puts up voltages, speeds, and temperatures on brandish (things that your BIOS may autumn short on). SpeedFan'southward applied science known as S.M.A.R.T. (Cocky-Monitoring Analysis and Reporting Technology) runs through your motherboard and video cards to extract relevant data. Here's how y'all can use it.
- Download, install and run the app on your PC
- When the app's main window opens, select Configure
- Now, visit the Fans tab and await for a list of all the fans on your PC to evidence up
- Select the CPU fan and use the Response curve to adapt its speed
The Response curve plots down the PC's temperature and the relevant fan speed. The upwards-sloping graph suggests that higher temperature leads to higher fan speed, simply y'all tin can configure that to your liking.
In that location are several costless fan speed controller software to SpeedFan like HWinFo, so if you don't find its interface or command effective enough, you accept got other options. If you lot're looking to go overboard, you can always purchase an external fan hub (for your desktop) or a cooling pad for your laptop.
How do I fix CPU Fan Speed errors?
The CPU Fan error is unremarkably triggered when you've turned on your PC. As such, the fan fault occurs before Windows 10 OS boots and is probably caused due to some hardware issue, and It may not be due to overheating. The most common cause why a CPU fan would run at full speed is that its sensor is not working properly. The solution here is to replace the fan itself. But you demand to see that the processor is not ever hot. You can use third-party applications for this purpose. These posts volition aid you if a CPU Fan Speed Error is detected or your CPU Fan runs at full speed always. You may want to besides to bank check your PC's total power consumption.
Read next: How to make your estimator run like new again.

Source: https://www.thewindowsclub.com/control-cpu-fan-speed-on-windows-computers
Posted by: penceharriew.blogspot.com
0 Response to "How To Control Fan Speed Laptop Windows 10"
Post a Comment